We stumbled on this accidentally last year as we were trying to get the Catalpa seedlings we started at the Chicago workrooms up to the farm.
Catalpa seedlings at 4 weeks old.
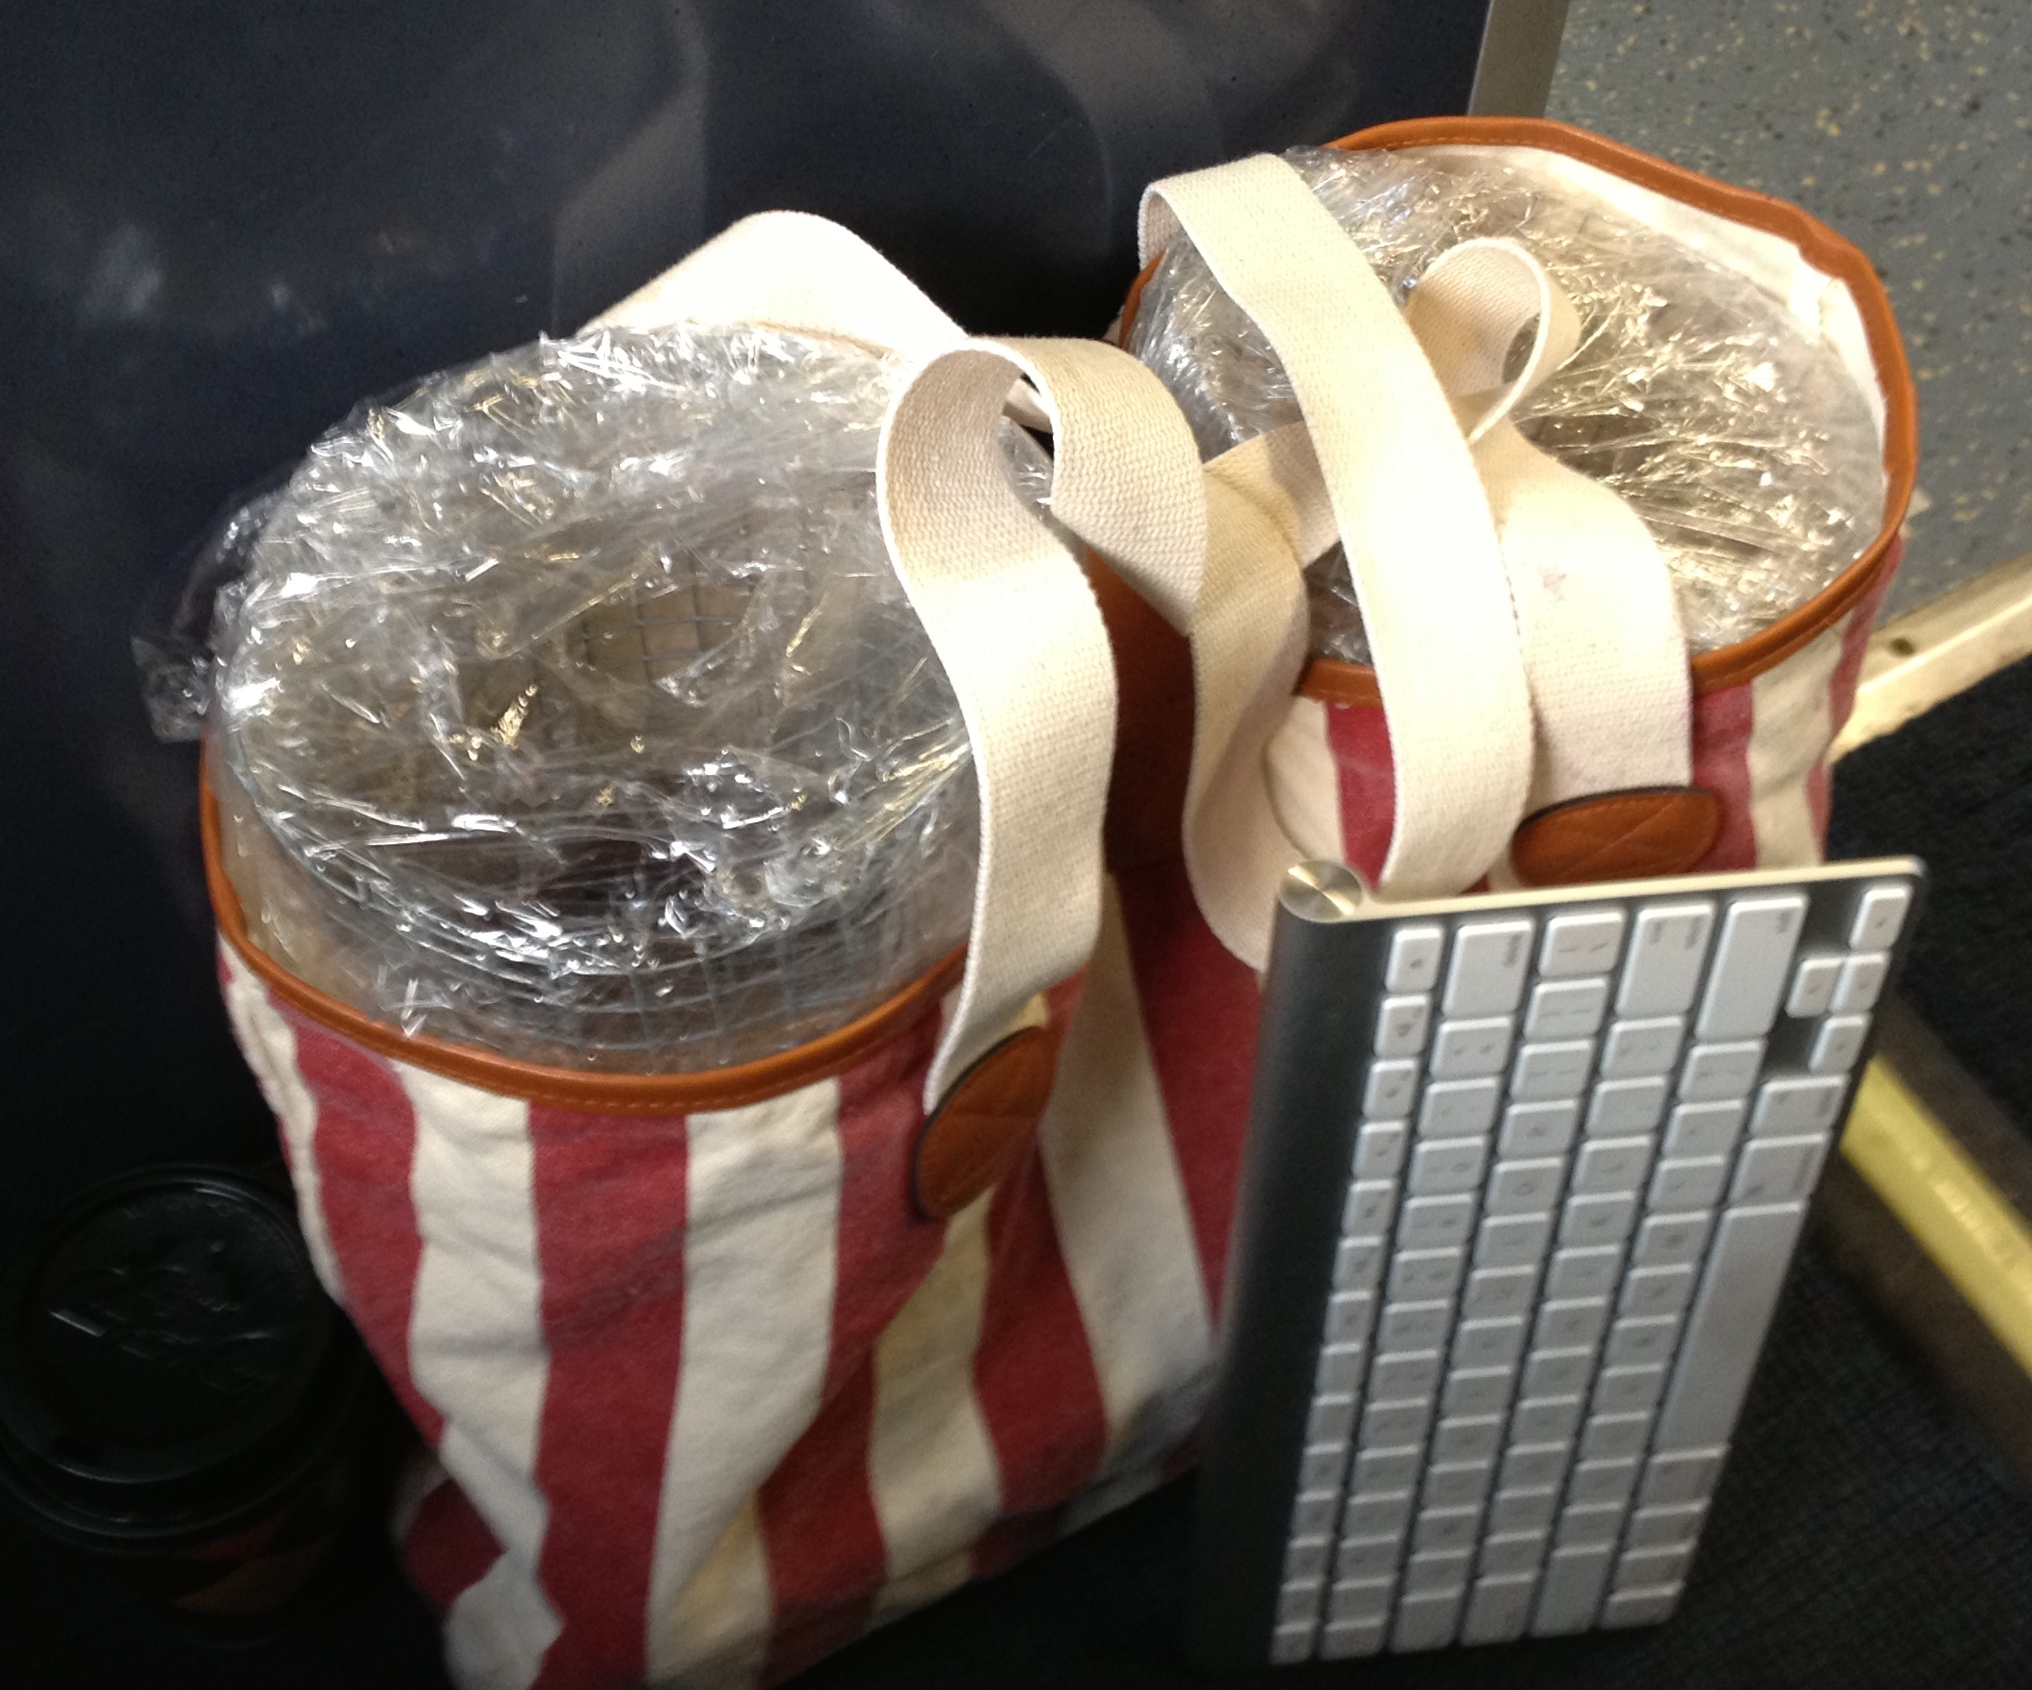
For the first couple of weeks, we used a cellophane-covered cage in a canvas bag and moved six at a time. That was taking forever.
Fine, but a little tedious on the train.
Then we noticed that there are three sewing machine cases that were sitting empty. Genius struck, and now we use them to transport all of our plants when we have to travel back and forth. It is light, protective, and very easy to carry!
Sewing machine cases make a great plant transport system.
And that’s it. No need to worry and fret about the stems breaking or it getting knocked about.
Winters in Wisconsin are brutal, yes. But what wears on you more than the long and cold Winter is the expectation and promise of Spring.
You wait, and then you wait some more. Then, one day it is 60 degrees out and you start working and preparing to plant. Once you have everything ready, it snaps cold and you are huddled once again in front of your fireplace with a bottle of Port and your tears thinking about those tomato seeds you just bought. Maybe your misspent youth too, but probably the tomato seeds. At least you can do something about those.
The easiest answer to all of this* is, of course, a cold frame.
Coldframe!
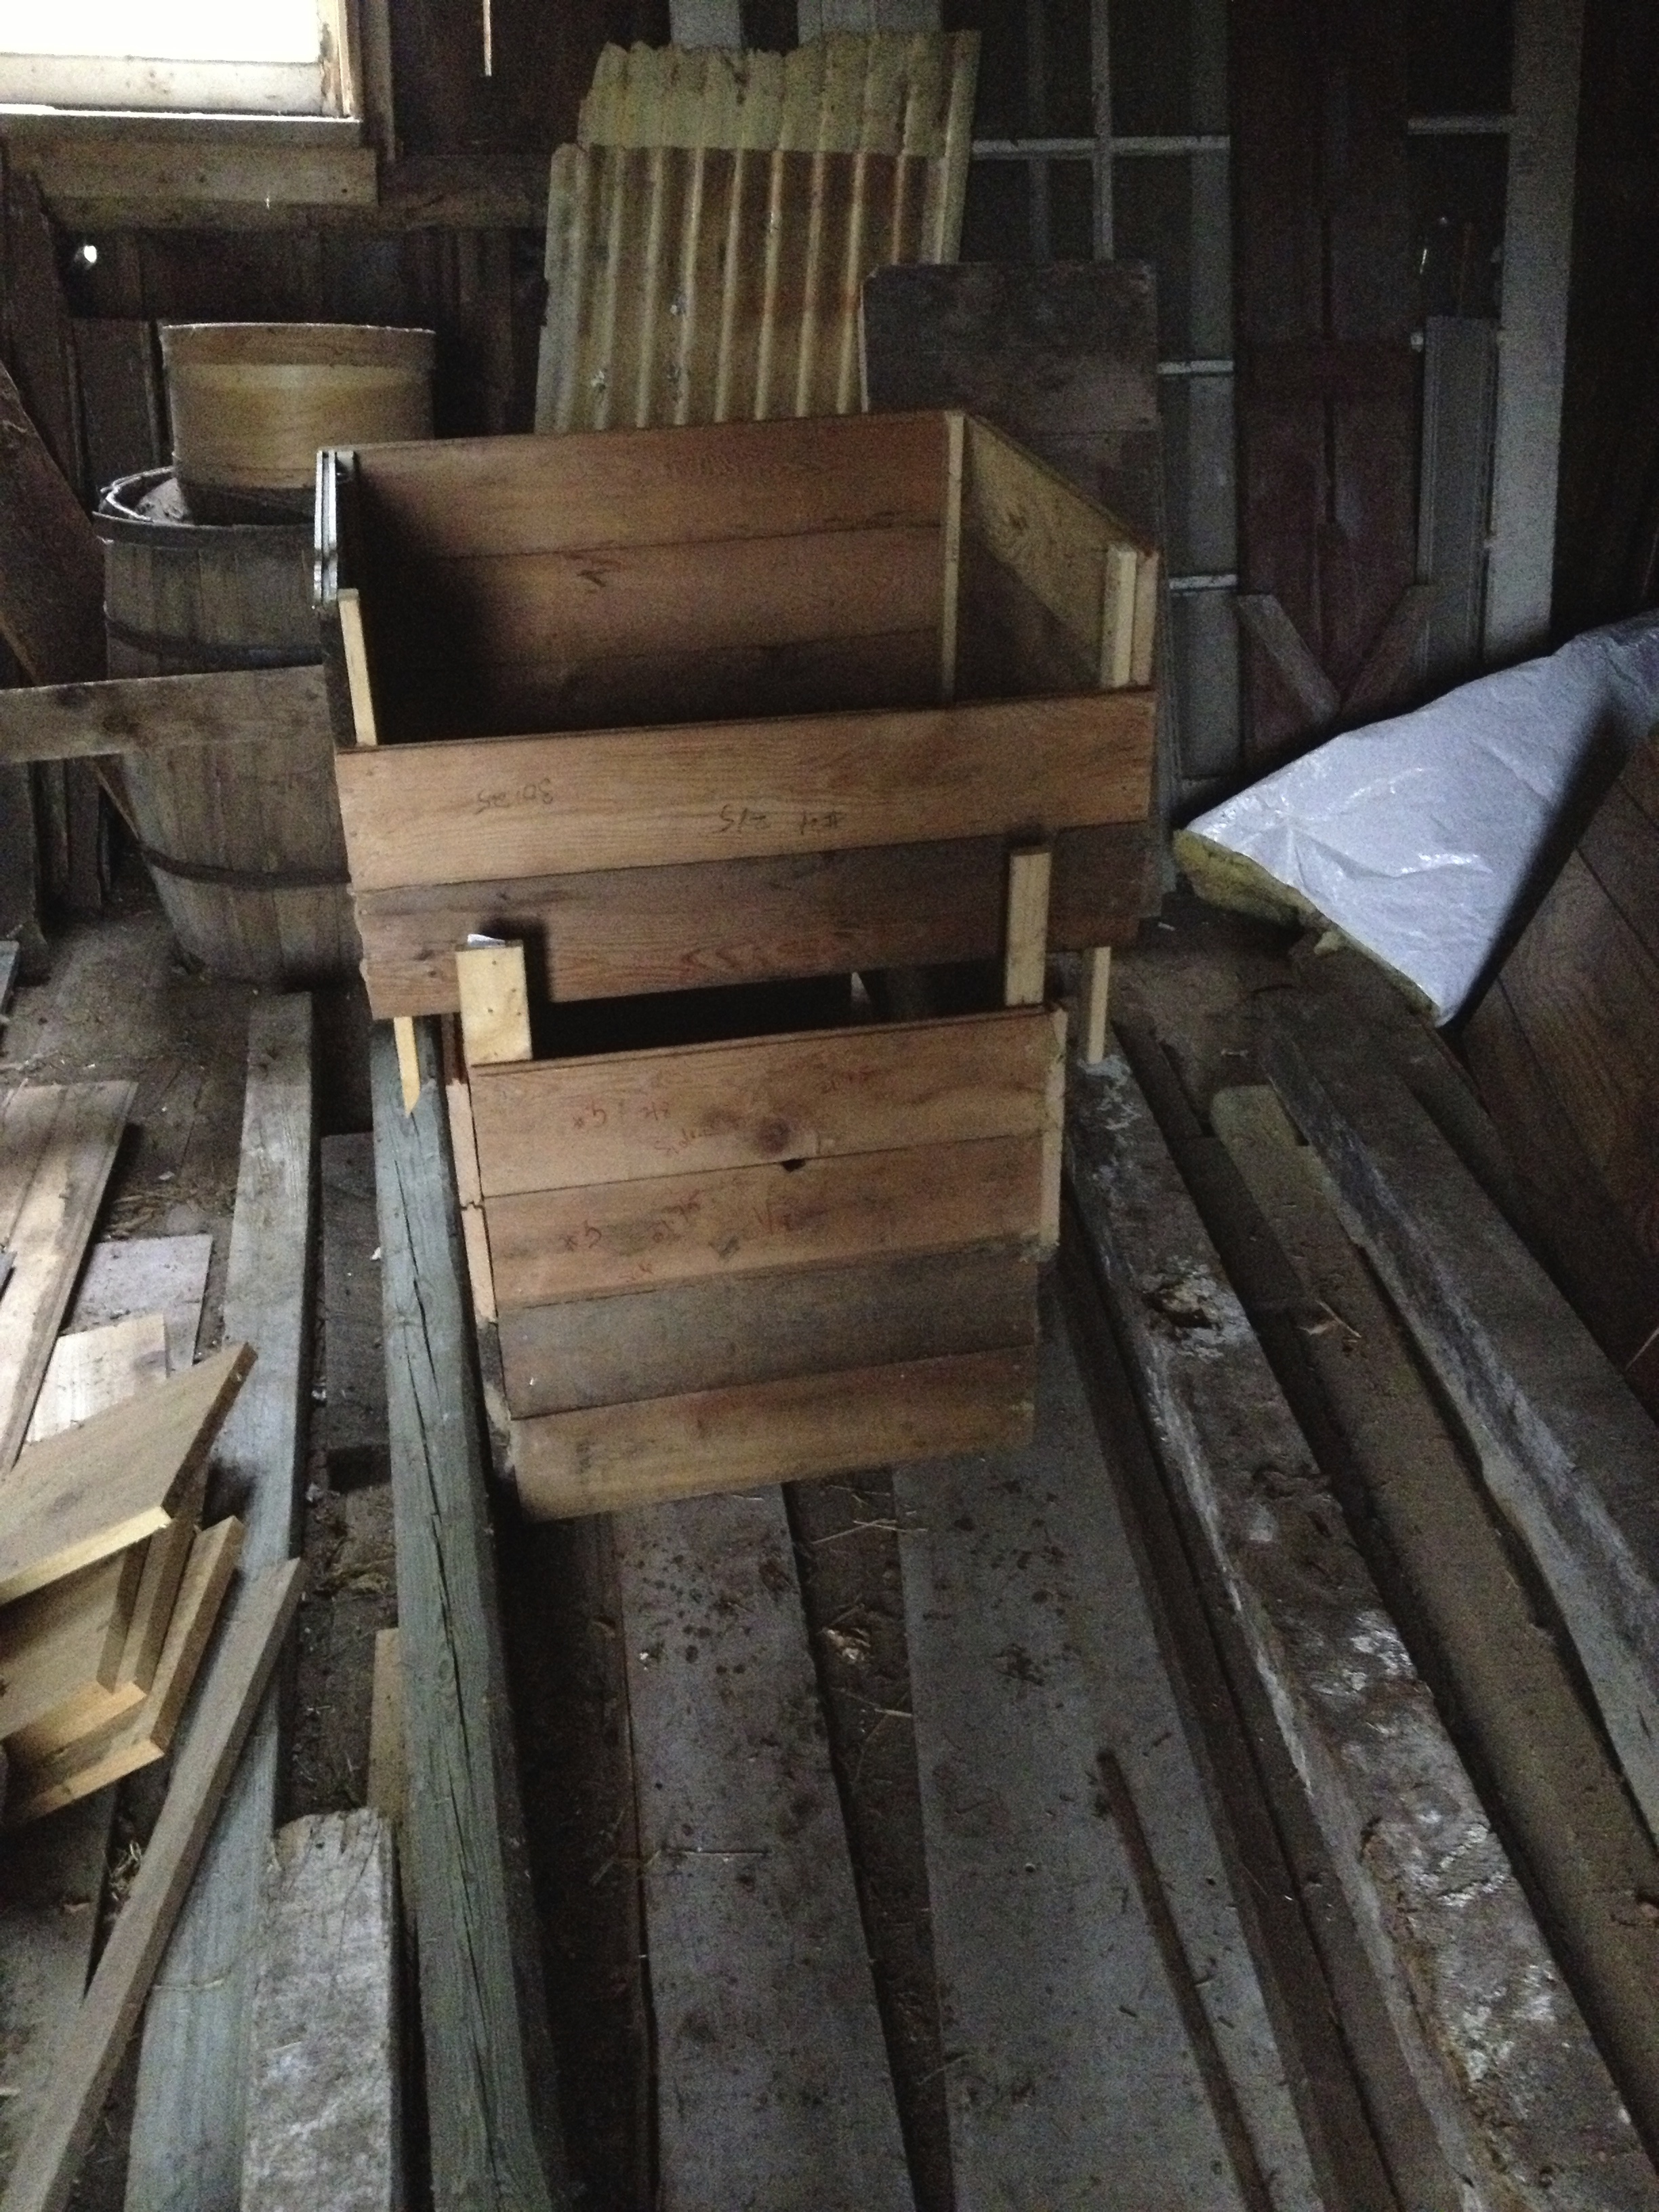
We started off this project, like so many others around the place, at Habitat for Humanity’s Restore shop in Plymouth. We found some really nice heavy old pine tongue and groove boards, caulk, nails, and paint. In the granary there were four old windows from places unknown that were still in great shape.
Essentially, whet you are doing is building a tightly fit box. If you are worried about a dry climate, you would cut a few ventilation holes, but since we are more concerned with keeping them moist, we sealed them tight. Once the plants get started the tops can be opened up to harden them off. In our case, we built three that keep excess water out and one that channels water into it.
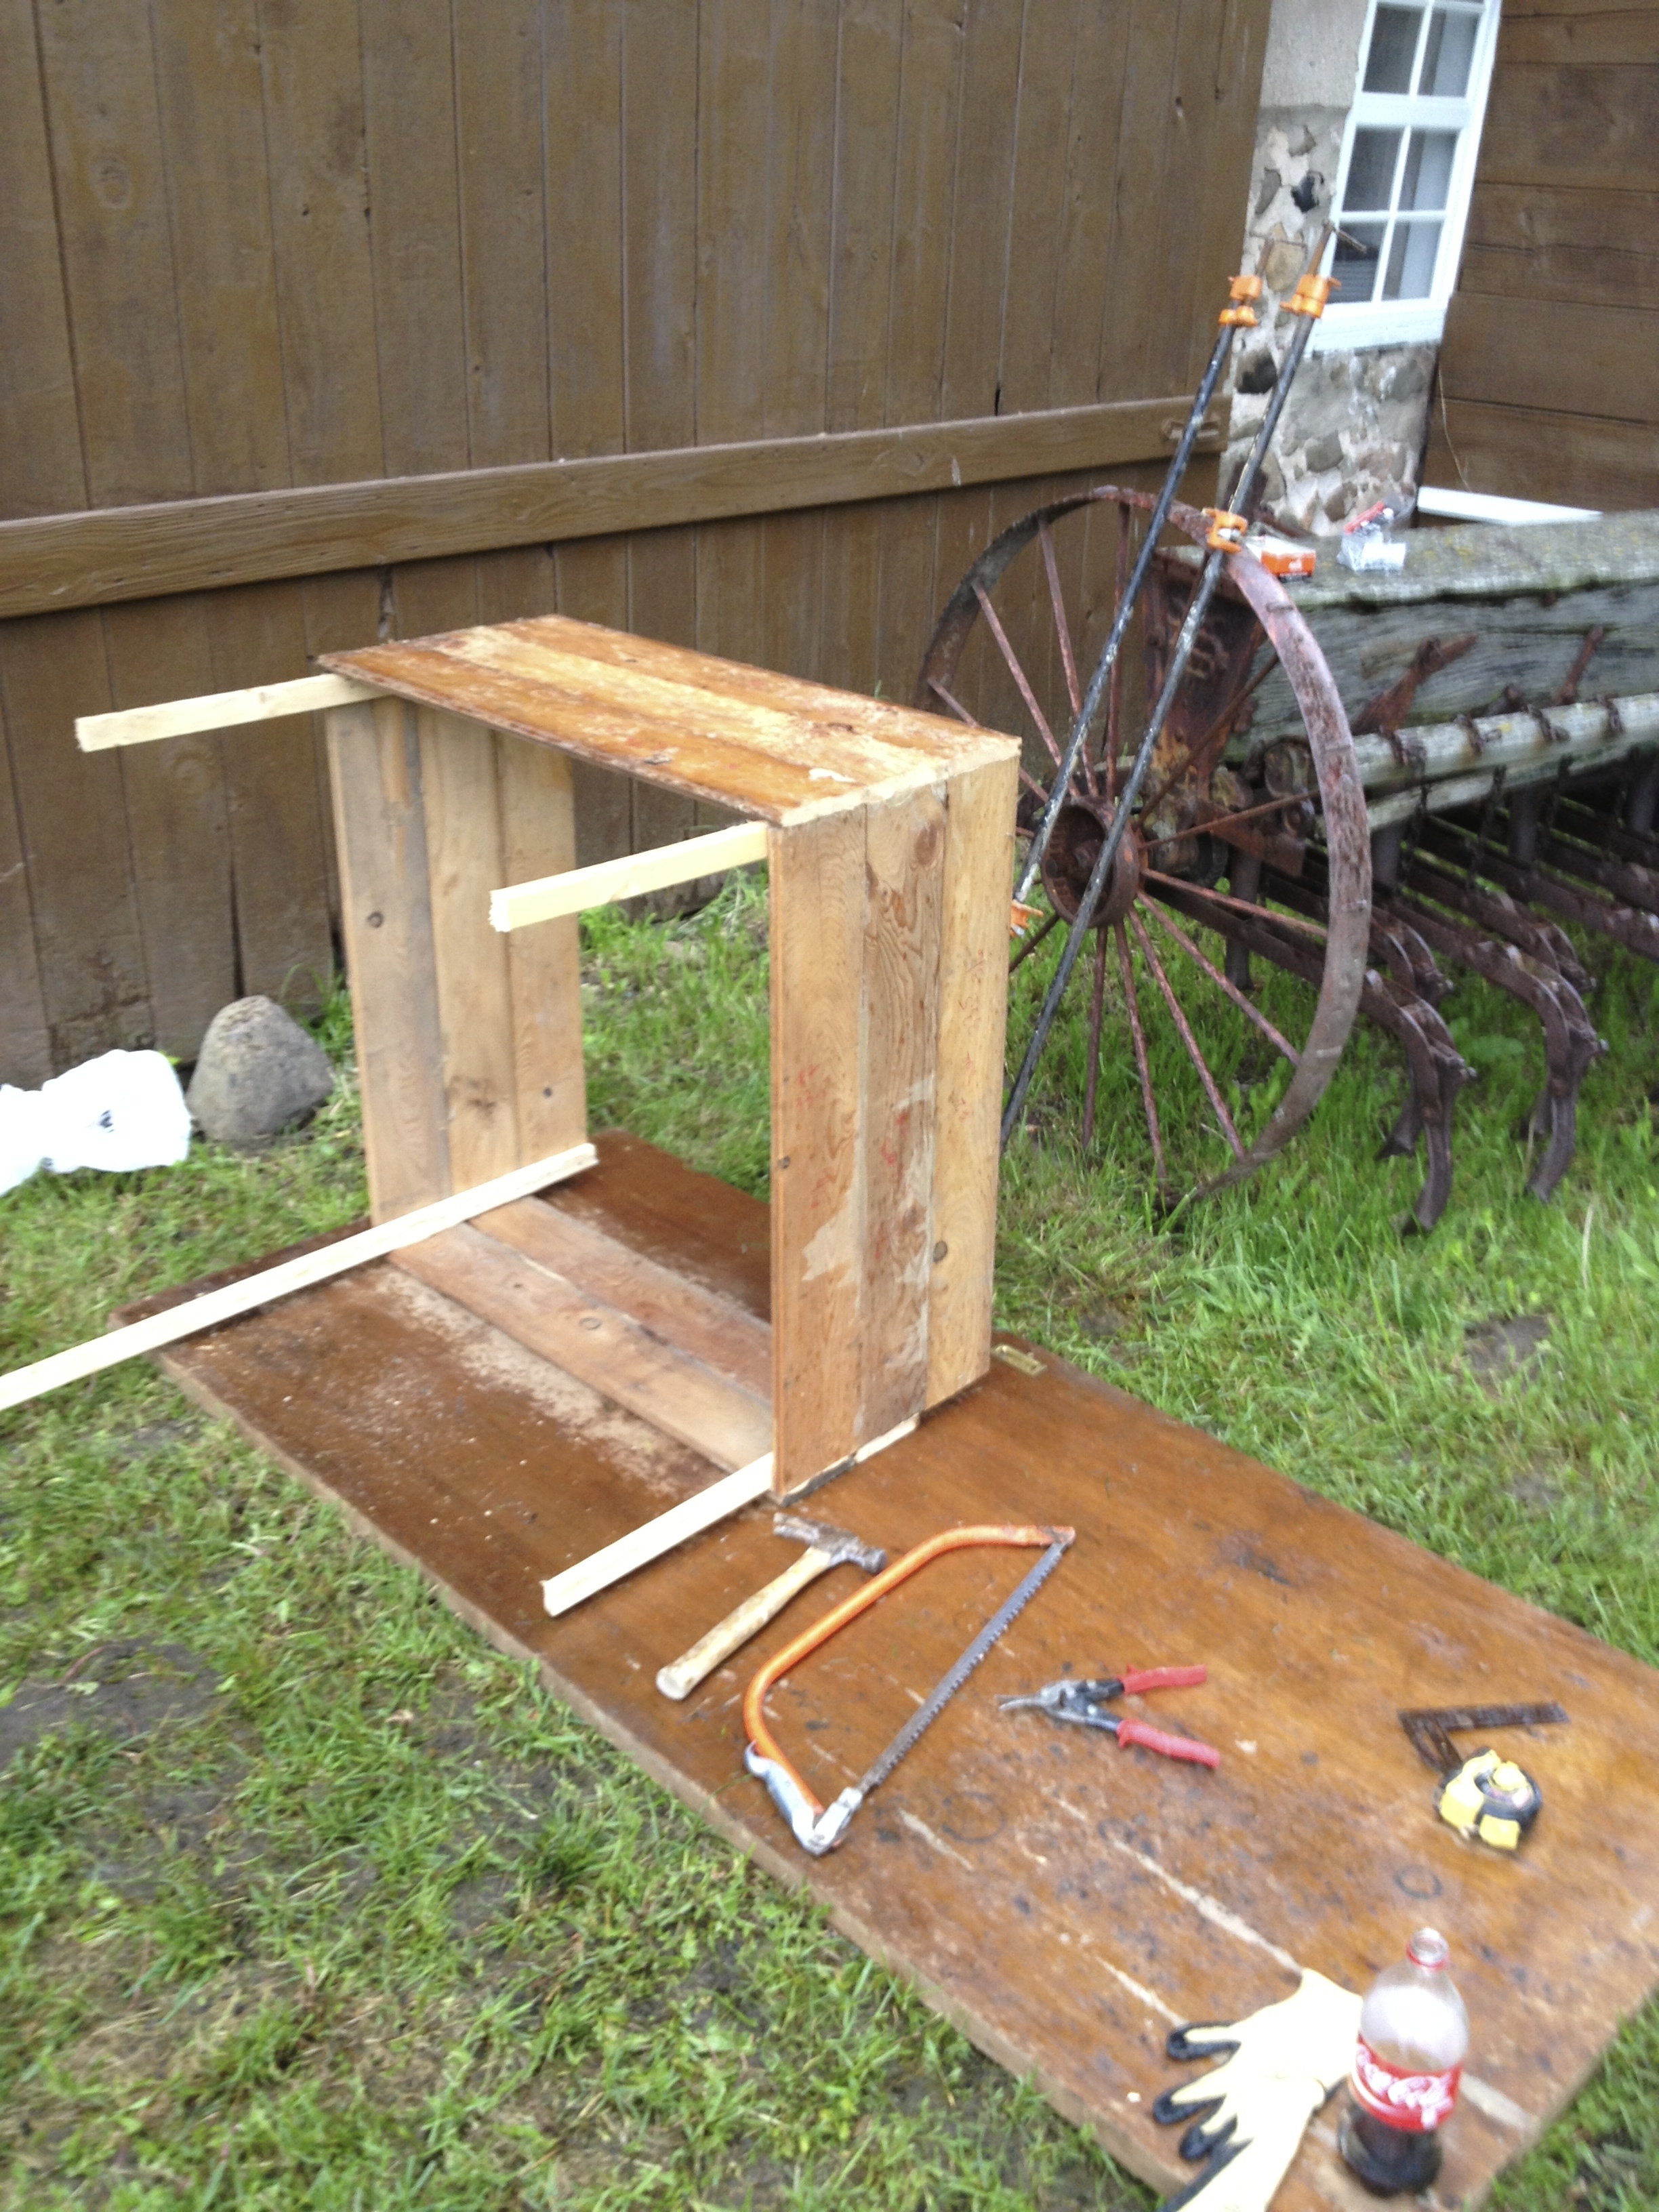
Make sure you revisit your high school geometry classes before you get started with something like this. If you don’t get the angles right and keep everything nice, square, and true… you, my friend, are in trouble. Either the window you are using will be too big or too small. It sits at an angle, so you have to revisit Pythagoras and Euclid to get this right. Not for long… Just sit down in the shade and have a beer with them. You will be glad you did.
Measuring width & length of windows…
Figuring…
Do the math, people! Do the math!
Figure for x. That is the length of your box.
Basically, the frame needs to be slightly shorter so that you have a nice slant in order for the rain not to pool on the windows.
After we built the bodies, we soaked them down a few times with Linseed oil.
Let the posts extend from the body and cut them off later so that you can compensate for any irregularities in the wood. It also gives you more pieces of useable scrap if you work and figure out little minor things like this as you go.
Try to build them on as level of a surface as possible. Our asphalt driveway worked well. Building them on a crooked or uneven surface may make you very sad.
Make sure your windows are clean and the glazing is intact. If you need to fix the glazing, do it before the window goes on and starts getting abused by Mother Nature.
As it turns out, we’ve been using them for early germination of most of our seeds.
Catalpa growing in coldframe
Notice the paint peeling off the frame on the far left. If you use silicone caulk, nothing will ever, ever stick to it.
Coldframe!
In situ coldframe.
But wait! There’s more!
If you live in the city and don’t have room for a proper cold frame, you can make one using heavy plastic and a wooden crate. We start seeds at the workroom when we can’t get to the farm so that things stay smooth with the planting and harvesting:
Catalpa seeds germinating in Chicago workroom coldframe.
We are lucky enough to have a skylight for a full day’s sun, but a South facing window works well.
Skylight coldframe.
If you use a piece of wide elastic around the lined crate you will get a nice seal for germinating or rooting.
And that’s about it! We have four large cold frames at Getaway now out on the South-East corner and a couple of crate cold frames in the Chicago workrooms!
*Well, the easiest answer to all of this is to get more Port from the Piggly-Wiggly in town and snuggle down with the dogs until the second week of June. So maybe this is the second easiest. Building the coldframe is definitely nicer to your liver.
Desensitize, Friendly, Head of the Herd, Cinch & Saddle, Porcupine, Halter
Dealing with a mare in heat kind of sucks.
I started off Thursday morning as usual with some grooming and friendly game, then took her back out to the pasture. We had a bit of a breakthrough during grooming, as she allowed me to pick her hooves without a struggle and gave me free rein with a gloved hand under her belly except her inner thigh.
About an hour later, I set up the track like I did last week. I thought that if it is just presented like it was before everything would be fine and it would just become a thing, not a BIG thing.
I even set up the camera on a tripod so that I could get some shots of us as we passed each thing on the track – this time it was the temporary cinch, then the saddle blanket, then the real cinch.
While it could have ended worse than it did, it didn’t end like I wanted it to. The wind was really blowing. This is flat countryside, so it is fast and hard. The cattails were literally whistling and the sound coming from the tall swamp grass on the end of the track was loud.
We did the little snippet of video you see above at the 1/8th mile mark (the track is a 1/2 mile track that is graded and banked around the curves), then proceeded to walk around the track. When we got the the quarter mile mark and the real cinch, she put her nose to it but lost any and all focus. All of the sudden I was dealing with a quarrelsome nasty bucking bronco. She started pushing against me and wouldn’t give me her head. I don’t think it was the cinch itself. I’ve been introducing it to her in the barn for a couple of weeks and she is always fine with it. It sits on the tack wall across from her stall and she sees/smells it often.
I noticed that she was a little more hesitant and pushy when we entered the track, but chalked it up to the strong winds and the curve I brought her in on. She doesn’t like walking sideways on any incline and acts like she is going to fall down – sometimes tripping herself and spooking in the process.
When I tried to redirect her by disengaging her hind quarters, she worked with me on yo-yo ground work for maybe 30 seconds and then around she turned and up went those hind legs 5 feet from my face. Luckily I am using a 20 foot lead and can give her some flex. I did not retreat, but it was tough to stand my ground and still be safe.
As soon as she went up and came back down, she would snort, cross in front of me and start eating grass.
I wasn’t sure what to do – I wanted to take that damn carrot stick and beat her all the way back to the barn.
But I didn’t. I mentioned before that I don’t want to wrestle with her and get hurt. So I thought I would let her think that she is getting her way all the while working my way back to the barn. In hindsight, I should have changed direction and worked back to the other side of the track. So when she would circle in front of me, I would lead her back to my side having taken 5 or 10 steps. It is something like an equestrian Spirograph, I thought.
Once we got back to the yard and she saw the pasture, she was better. Once she saw the barn door, she was fine.
Because I didn’t want the session to end on a negative, I walked her up and down the asphalt driveway and in and out of the round pen a couple of times before taking her back into the barn. I took the lead rope off and let her hang out with me in the barn for a while as I alternately worked and did friendly stuff with her.
Then I noticed that she clings to the stall doors of the two geldings in the barn – Chief and Boomer. I asked Cynda what was up with that and she sighed and said that Kameo must be in heat. When I explained the whole thing she said “Oh, yeah. She’s in heat. This is why a lot of people don’t like dealing with mares.”
As the two days played out, I noticed what can and won’t happen when she is in heat.
She will work with me in the barn aisle or in the pasture, but leaving the male horses is out of the question. She tuns into a real jerk. I have never paid any attention to horses in heat before, and let me tell you: It ain’t pretty. She is such a little clingy slut! Constantly lifting her tail and “winking” in front of the geldings… who really can’t be bothered to notice. In fact, Chief kind of torments her by grabbing anything hanging from the ceiling around her and rattling it so that she startles.
So it turns out I am going to have to make lemonade out of some lemons. Gross, winking lemons.
We did the rest of our work in the barn with her lingering next to the stalls of the males. We actually got a lot done.
You can see in this video that the males are more interested in playing with each other that her. If you watch Chief (his is the stall she is standing in front of. He is a retired racing and polo thoroughbred.) you can see that he likes to grab the cross-tie chain outside his stall and swing it at her. When I am working with her, he will do it when her back is to him to startle her.
Since I am incorporating a lot of cinch and saddle work into our friendly play time without actually expecting her to bear weight, she is fine with it. I am going to make sure that at least twice a day when I’m on the farm she is blanketed, cinched, and saddled. I think we will even spend just some hangout time with her fully dressed.
So what did we get done, even with her in heat and grumpy?
We have been able to get her in a bridle.
She has been introduced to a bit.
She can deal with the sound of plastic.
She can take a saddle, pad, and cinch with minimal fuss.
She can give me her hooves without a fight.
She can, after about 30 minutes of grooming, be touched anywhere except her inner thigh.
I had been around Kameo throughout the Summer and Fall, but she was always a bit of a handful. Most of my time was spent with the older, more experienced horses out on the track or on the trails.
Having watched a number of Parelli videos loaned to me, I thought that the friendly game and some general getting-to-know-you was in order if I was going to be the one to train her.
So we started with a carrot stick and a soft face brush.
No need to push this.
When I got to Getaway Farms on Thursday morning, I had a cup of coffee and sat down to talk about direction with Cyndi, the farm’s owner. She warned me about moving too fast and letting things get out of hand. “Make sure that you are matter-of-fact with her. You don’t want to have to dance around and tiptoe all the time, but you don’t want to be too rough. If it starts going wrong, jut stop and let her think. You’ll see her get frustrated and have to think when you do, just rest and let her think.”
And with that, off I went to the barn.
This being the first day, I didn’t have anything else on the agenda but friendly games. I wanted her to feel comfortable with me and understand that I wasn’t a threat. I only have two days a week to train, so I can’t let my rush for results interfere with the process. How annoying would it be to approached by someone who says: “AREN’T WE GOOD FRIENDS? DON’T YOU SEE HOW MUCH I LIKE YOU AND HOW I AM REALLY NOT A THREAT??!?” over and over again while they try to put their fingers in your ears and rub all over you?
I went out to the pasture and singled her out. Without too much trouble, she took a halter and allowed me to lead her into the barn. Even though she likes me, we didn’t start off with a lot of aggressive direct contact. I walked her up and down the aisle, then started working out physical touch with a carrot stick and lead rope.
She has a strong flinch and it seems like I will never be able to touch her directly for any amount of time. It is like a scared full-body shiver that runs through her from the tip of her nose to her hooves… the back two click-click-clicking on the floor of the barn in a kind of warning rush of nervous energy. I am no cowboy, so I took it easy with her and let her decide how much she trusted me. To be brave and bold are noble goals. To be foolhardy around a scared horse (especially THIS scared horse) is lunacy. I was able to run a brush down her back eventually, but she wouldn’t offer up her legs or hooves and currying her was out of the question.
One of my jobs in my city life is teaching design and sewing to adults. This doesn’t ordinarily impact the horses, but there are interesting side effects when I talk about my rural life to city women. I was talking about Kameo in class one night before I started this training experiment and one of the students mentioned that with few alterations I could be describing a person with PTSD. This is not to belittle the pain of those who have suffered, but rather to give them some understanding in human terms of what this mare is going through as I gently work with her.
We kept the sessions short but on a schedule. I was working with her for about 10-15 minutes at a time every three hours. I wanted her to feel comfortable but still focused throughout the day.
After the third session of the day, she started hanging out in the pasture right outside of the barn door. When she would see me out in the yard on the other side of the fence she would walk over and look. She is alert.
By the end of the time at Getaway, she was taking a halter and being led into the barn with no problem. A couple of the sessions we did out in the pasture because she seemed to be too wound up to be led away from the herd.
And so our first training week ended well – she seemed to be okay with me leading and working and she didn’t mind the schedule. Next week we will add a couple more things and start with some desensitization.
I am not going to push this. I would like to have her under a saddle by the middle or end of Summer, but I am not pushing things. I want all of our sessions to end well. With her that may take a lot of work.
I thought I would explain a bit about what we are going to try to do with Kameo over the next few months.
Cyndi and I have talked about goal and process a lot. and have come up with a timeline that is a little compact and aggressive without being too heavy with expectations that could make this whole thing a terrible wash.
Pat Parelli is a horseman and trainer that runs and international horse training operation with his wife Linda. Pat is the Western rider and Linda cut her teeth long ago in high-level dressage. They make a great pair. Each of them has a slightly different approach with the horses, but they use an organic natural training.
Their training (as I am understanding it) is based on what they call the Seven Games. These are games that Pat developed as he worked with and watched horses over his career. They are games that horses play with each other and humans can play with them. You use the Seven Games to speak the horse’s language during training.
The seven games are:
Friendly Game
Porcupine Game
Driving Game
Yo-Yo Game
Sideways Game
Circling Game
Squeeze Game
More information can be found about these games and horse-training philosphy at the Parelli website and the links in the sidebar of this site, but here is a (very) basic breakdown of what they are and what they do:
The Friendly Game is a way of introducing yourself physically to the horse and letting it know that you aren’t a threat. You do it with a carrot stick and rope initially. After the horse is comfortable with you touching them all over with the stick and rope, you can work into more aggressive and personal touching. In this case, we are going to have to go SLOW. Every day we will have to start off with maybe 45 minutes of friendly game and incorporate it into all of our interactions.
The Porcupine Game is a way of getting the horse to respond to pointed and direct pressure. The point isn’t to poke at the horse, but for them to understand the implication of direct pressure.
The Driving Game is a kind of outgrowth of the porcupine game. You use it to imply pressure to direct the horse.
The Yo-Yo game is a game of backing up in a controlled and direct way.
The Sideways Game is just that.
The Circling Game is a way for the trainer to direct the movement of the horse in an intentional way.
The Squeeze Game prepares the horse for tight spaces and helps them overcome their claustrophobia.
Now the Parellis aren’t the only game in town, and like I tell my sewing and design students: You want to find out as much information from as many different sources as possible for a couple of reasons. On one hand, you may find the same information written or presented in a different voice that appeals to you more. Always look around.
When I was researching how to train and what I was going to need to do, I started with Parelli through Cyndi and my cousin Bill.
I was worried that I wouldn’t be able to make a difference in just two days a week, but Bill said that if we managed it right, it should make a difference. I would have to be careful not to push too hard and that I may have to extend my timeline a little, but two days a week would work if we kept it together.
I sat down and started to think about the problems we were up against, the positives we could use to our advantage, and the schedule we would need to come up with.
Here goes!
Goals:
Have a sweeter, kinder horse.
Have a braver horse.
Have a breed-able horse that won’t imprint its own negative traits in the foaling stall.
Have a functional horse from a riding and working perspective.
Problems:
There are a few problems right off the bat.
Halter and leading
Touching and trust
Movement and direction
Spooking and fear
Biting, nipping, and kicking
Positives:
There are a few good things about her:
She is whip smart. She can pick up on things fast.
She is in great shape.
She has tons of energy.
She isn’t food driven. This is nice. It means I don’t have to have a pocket full of treats to get my point across.
She really likes me, it seems.
Schedule:
I have two days a week that I can be out on the farm. Kameo can’t take two 12 hours of instruction. Both of us would be in a battle of wills. I don’t need to prove that I am the Duke of Wellington to her Napoleon.
I am going to have to come up with a schedule that is a bit of a challenge and yet gives her some time to think and relax.
Process & Schedule:
And here we are. The process. I am going to have to come up with a direct and yet somewhat flexible schedule for us. Here is what I’ve cobbled together:
Week 1: Friendly Games, grooming, leading
Week 2: Friendly Games, grooming, leading
Week 3: Friendly Games, grooming, leading, begin desensitization
Week 4: Friendly Games, grooming, leading, desensitization, begin porcupine, begin some squeeze game to prep for trailering
Week 5: Friendly Games, grooming, leading, desensitization, porcupine, squeeze game, begin saddle & cinch as a friendly game, begin introduction of bit & bridle
Week 6: Friendly Games, grooming, leading, desensitization, porcupine, squeeze, saddle & cinch as friendly game, introduction to bit & bridle
Week 7: Friendly Games, grooming, leading, desensitization, porcupine, squeeze, saddle & cinch as friendly game, begin driving, bit & bridle
Week 8: Friendly Games, grooming, leading, desensitization, porcupine, squeeze, saddle & cinch as friendly game, driving, begin circle game, bit & bridle
Week 9: Friendly Games, grooming, leading, desensitization, porcupine, squeeze, saddle & cinch as friendly game, driving circle game, bit & bridle
We will leave it there for the time being. I am still pretty new to this and have to remember that I can’t put a horse on a training schedule like I would schedule a dress for one of my clients.